Very often, even experienced gardeners, making considerable efforts and applying the most advanced agricultural practices, encounter a crop failure problem in the fall. And there is nothing surprising in this - a person, in spite of all his knowledge and skills, is little able to oppose the vagaries of nature: torrential rains, droughts, late frosts. Although, the solution to the problem of climatic disturbances for the crop still exists - the polycarbonate greenhouse "Uralochka".
Design features of the Uralochka greenhouse
Greenhouse "Uralochka" - an arch type design designed for growing various crops in greenhouse conditions. The fact that the structure has an arched architecture, and it does not have corners, contributes to normal snowfall gathering under its own weight, as well as good resistance to strong winds (the sail effect is reduced).
The design consists of hollow arcs, bent on the machine, having a cross section of 20 × 20 mm, in a reinforced version, the base is assembled from a more powerful profile of 40 × 20 mm. The difference between the Uralochka standard and reinforced also lies in the distance between the arcs: the pitch between the stiffeners in the standard version is 1 m, that is, 3 arcs per 2 m of the length of the structure, while in the reinforced version 4 are located at the same distance ribs (respectively, the distance between them is approximately 0.66 m).
Arc and base have a special coating that is resistant to corrosion. The reinforced version is able to withstand loads in the form of a sufficiently large mass of snow (40 kg / m²) and strong wind (up to 30 m / s). Some structural elements (vents and doors) are mounted using a welding machine. Due to the low weight of the structure, the installation of the greenhouse is carried out directly on the ground, there is no need for the construction of the foundation.
Of the extremely useful features of the greenhouse, one should highlight the following: you can lengthen the structure, absolutely without any difficulties, without resorting to any major restructuring. To do this, simply extend the base profile and install additional arcs; for these purposes, an extension cord is provided, which is included in the kit.
The polycarbonate coating transmits well the sunlight necessary for the normal development of plants, while it perfectly retains heat inside the building. Even in fairly northern latitudes, Uralochka, at not too low ambient temperature, is able to maintain positive temperature indoors without an additional heat source.Did you know? First substance-the progenitor of modern polycarbonate, it was described in 1898 by the German chemist Alfred Einhorn, a scientist who is known for synthesizing novocaine.
The structure is mounted very simply: for its installation it is only necessary to stick several pegs that are included in the delivery package into the ground. Due to its simplicity and reliability, there is no need for annual preventive maintenance of the structure.
Benefits
- Among the advantages of the Uralochka greenhouse, attention should be paid to the following:
- unlike many other similar designs, the Uralochka polycarbonate coating is mounted end-to-end, not lapped. This circumstance facilitates installation and cleaning, and less dirt accumulates in the joints of the panels;
- due to the composition with which the joints are poured, condensation does not accumulate in the structure;
- the structure is easy to assemble and easy to operate;
- no need to build a foundation;
- the structure can withstand significant loads in weight and wind speed;
- with completely blocked ventilation, the positive temperature is maintained even with significant frost in the environment;
- convenient arrangement of window leaves;
- structural strength;
- polycarbonate coating thickness - 4 mm;
- the construction does not require annual repairs, including painting and priming;
- tolerates temperature differences;
- the ability to replace individual damaged polycarbonate sheets;
- Designed for a fairly long life, regardless of the region of use;
- does not pass UV rays.
Disadvantages
- The main disadvantages of the Uralochka greenhouse:
- the metal of the profile is quite thin, when the frame is deformed, the structure cannot be restored. In this case, you have to purchase a new greenhouse. This extremely unpleasant circumstance can arise as a result of strong sticking of wet snow (over 40 kg / m²). In this case, the frame may bend;
- only the outer layer of the carcass is coated with anticorrosive paint, inside the pipes they become corroded after the first operating season (this does not apply to models made of galvanized profile);
- some mounting holes in the profile may not be located in their places, so you should be prepared in advance for a possible problem;
- the manufacturer gives the design only 12 months of warranty service.
Selection of optimal greenhouse sizes
Depending on your requirements, as well as on the available area for installation of the structure, you can choose the size of the greenhouse that is suitable specifically for the purposes for which you plan to use it.
Check out

The width of the structure can be 2; 2.5 and 3 m. That is, the area of the minimum standard greenhouse (6 × 2 m) is 12 m². The largest construction area in the standard version is 30 m² (10 × 3 m). But, as already mentioned, if 30 m² of usable space is not enough for you, it is quite possible to build a more spacious structure.
If you need a greenhouse exclusively as a greenhouse for growing seedlings, possibly greenery, then it is quite possible to be content with the minimum size. If you want to have fresh vegetables on the table all year round, you should think about a larger room.
In the same case, if you are engaged in the cultivation of vegetables and other crops (flowers) for sale, it would be advisable to equip a greenhouse of the maximum standard size, or to build an enlarged room according to an individual project (after all, the structural solutions of the product allow this to be done).
Did you know? The first greenhouses were invented in ancient Rome. The prototypes of modern greenhouses were small wagons, with vegetables, fruits, flowers planted in them. In the daytime, the carts were in the fresh air and heated by natural sunlight, and at night they were transported to heated rooms.
How to assemble a greenhouse "Uralochka" do it yourself
Assembling the Uralochka greenhouse is not a big problem. The package contains detailed instructions with which you can quickly assemble the structure. To get started, you should choose a suitable place.
It must meet certain requirements:
- the site should be flat, with the occurrence of groundwater at least 2 m from the surface;
- it is advisable to place the structure so that the vents are located on the south side;
- there should not be shading trees nearby;
- if the greenhouse will be used for some few related crops, follow this rule: for plants that love heat, the greenhouse is oriented west-east, for vegetation that prefers shade, it is advisable to install the structure in the north-south direction.
Before starting the assembly of the structure, it is necessary to prepare the following tools:
- shovels (bayonet and pick);
- hammer;
- roulette;
- rope with a plumb line;
- level;
- bench scale;
- drill or screwdriver;
- Phillips screwdriver
- spanners;
- construction knife.
Did you know? England has the largest greenhouse on the planet. Construction called «Eden», represents 2 domes similar to bee honeycombs, having an area of 22 thousand m²This corresponds to an area of approximately 3.5 football fields. Greenhouses were built for about 30 months, and the construction itself cost more than $ 130 million.
Foundation selection
As already mentioned, Uralochka does not need a capital foundation, due to the ease of construction. It will be enough to choose a flat place, without a bias. However, if the soil in the place you have chosen is quite loose, you still need to install a strip or wooden foundation. In any case, it will be necessary to compact the soil in a selected place. For these purposes, you can use the machine for soil compaction.
Another option that is quite suitable for the construction of such a mass is to strengthen the mounting stakes-piles by pouring them with concrete. To this end, on a pre-marked site, dig holes under the pins. The depth of such a pit is 0.6 m, the diameter is about 0.5 m. The pins are installed vertically, using a level or plumb.
You can use pipes with a diameter of 200 mm vertically driven into the ground for structural strength in those places where the mounting pins will be installed (the pins should be located exactly in the center of each pipe).
Installation of a strip foundation, which can be made of a cinder block, a foam block, or pour concrete into a wooden formwork is not much more difficult (mounting pins are installed in liquid concrete, constantly monitoring their vertical position).
But if you have chosen a place for a structure with sufficiently dense and compacted soil, it is quite possible to do with pegs stuck directly into the ground, especially if the structure is small. That is, before starting the assembly of the structure, you should have a cleared and leveled platform with a well-compacted surface and pegs installed for marking, or a foundation of your type.
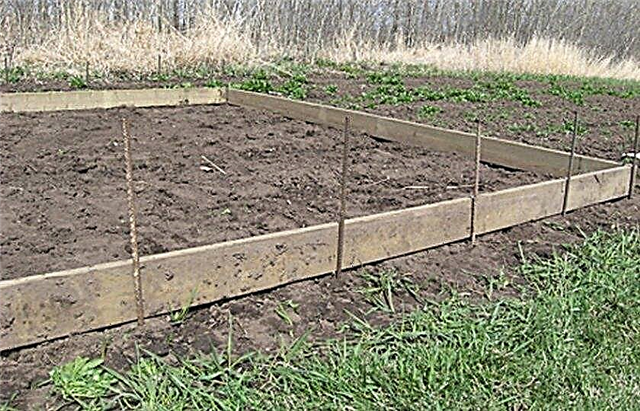
A very simple and at the same time sufficiently functional foundation can be made using a board (50 × 250 mm).
To make such a foundation is quite simple:- Mark the perimeter of the foundation based on the size of the greenhouse.
- Install along the perimeter of the marking of the board so that the flat side is vertical, and the sides (ends 50 mm thick) lie on the ground.
- On both sides of the board, hammer the pegs from the reinforcement in a checkerboard pattern, the distance between the pegs on one side of the board is 1.5-1.6 m. There should be a peg on the other side between two adjacent pegs located on one side of the board. That is, the distance between the pegs located on both sides should be approximately 0.75-0.8 m.
- Using a hammer, drive the board into the ground by 5-7 cm, controlling the horizontal location of the upper edge using a level (the greenhouse will be mounted on it). If necessary, to raise up any part of the board, lay a piece of brick.
- When the boards under the foundation are installed, and the horizontal is verified using the level, they are sprinkled on both sides with earth, ramming it.
End assembly
Of all the details of the frame, the end walls are first assembled and sheathed.
Do it this way:
- Unpack the end faces, place them at the assembly place so that all moving parts open up (out).
- Cut a 6-meter polycarbonate sheet into 3 parts (2 panels 202 cm long, and one panel 196 cm long).
- Remove the protective film from the surface of the polycarbonate, position the polycarbonate so that one of the parts (202 cm) covers the part of the end wall on which the door hinges are attached, and directly the door of the structure.
- The edge of the polycarbonate sheet should not be screwed flush with the side frame of the door, but should extend about 1.5-2 cm beyond it, reaching almost the middle of the pipe frame of the doorway. Thus, the part of the sheet that extends beyond the door will overlap on the adjacent profile of the doorway, performing the functions of a mock plank.
Important! After the polycarbonate is screwed to the profile with self-tapping screws, slightly loosen the self-tapping screws, and using a brush, remove the chips that will appear between the polycarbonate and the profile pipes after screwing in the screws. In the future, this shavings can cause corrosion processes.
- Polycarbonate is attached using 5.5 × 25 self-tapping screws. The profile already has mounting holes in which the screws are screwed. It is better to fasten polycarbonate to the profile together: the first 2 screws are screwed in with the assistance of an assistant who will hold the sheet so that it does not move. After that, you can continue on your own.
- When the coating sheets are fixed, carefully trim the excess (the remaining pieces will be needed for further sheathing) with a construction knife. Using the same tool, make openings. It is not necessary to cut the coating between the door and the frame (between the parts of the profile on which the door hinges are located). After you open the door, the sheet will bend sufficiently for the door to open normally.
- The second end wall is sheathed in the same way. Hooks for fixing vents and locks are installed based on their own considerations. Handles are installed in the holes intended for this, using M4 × 30 screws and nuts of the corresponding size.
Video: Assembling the ends of the Uralochka greenhouse
Frame assembly
The assembly of the frame begins with the installation of the foundation of the future greenhouse. In the event that you did not fill the foundation, dig 6 pipes with a diameter of 20 cm into the ground according to the marking of the structure or dig holes in these places and pour concrete into them, setting the mounting poles in the center, controlling their vertical position.
The base is mounted directly on the surface of the earth.
Installation is simple, and consists of the following sequence of actions:Important! It is necessary to mount polycarbonate to the profile in this way: one side of the material is covered with a film with the logo of the manufacturer, the other side is covered with a film without inscriptions. The side of the polycarbonate sheet on which the logo is depicted has a UV coating, the sheet must be attached to the profile so that this side is directed into the external environment.
- Arrange the base pipes so that the guides for the arcs look up and inside the structure, the joints of the base pipes are connected using fixing plates (they should be located inside the structure) and M6 × 50 screws using a wrench and a screwdriver. The screws should be tightened sufficiently so that the base has sufficient rigidity.
- The assembled base is installed on a plank or strip foundation, pipe piles, or on concrete holes filled with concrete using lugs.
- Then, arcs are attached to the base, and a stringer (side ties) is installed between the arches. For fastening, bolts M4 × 55 are used.
- After the arcs are installed on the base, and connected by couplers, end walls are installed, fastening them to the base and screwing to the stringers.
- Between the arches, a window is mounted using the self-tapping screws included in the kit. Install the window where you see fit. It would be more expedient to install it from the south side if the end walls are oriented along the east-west axis.
Video: Assembling the Uralochka greenhouse
Frame cladding
After the frame is fully installed on the base (arcs, end faces and vents), it is time to proceed to the skin of the structure:
- The polycarbonate coating of the side walls should go beyond the end walls by about 4-6 cm, forming a kind of visor above the ends of the structure.
- Polycarbonate sheets are laid from the ends to the middle, the last to be laid is the sheet that is in the central part of the structure.
- Fasten the coating with self-tapping screws, screwing them into the structural holes on the profile. At the bottom, sheets of plastic can be screwed with screws to the plank foundation, if you installed it. The cellular structure of the coating should be parallel to the arcs.

Tips for the maintenance and operation of the Uralochka greenhouse
The construction of the Uralochka is quite solid and sturdy, able to withstand quite serious loads, and does not need repair for a long time.
However, in order for you to use the building as long as possible, you need to follow some simple recommendations:
- In winter, additional reinforcement of the frame from the inside with struts installed between the floor and ceiling mounts will not hurt. Such reinforcement will not be superfluous in case of heavy snowfalls.
- Clean the plastic coating with ammonia-free or hard abrasives.
- After the crop is harvested, it is necessary to remove all garbage, dry leaves and branches in the building.
- The ends of the coating, as well as the joints, and in general, any places where the cellular open structure is in contact with the environment, it is better to sealant.
- Before laying the substrate in the greenhouse, care should be taken to waterproof the arc fasteners. For this purpose, garden film and boards are laid along the side walls.
Important! When cutting polycarbonate sheets screwed to the profile, especially when making cuts for the air vents, be very careful. Try not to touch the paint of the profile on which the coating is screwed, otherwise, even the smallest scratch can cause corrosion processes. When making slots for the vents, it is better to cut only the outer layer of the coating, and after you open the vent, you can gently break off the inner layer along the desired line.
The greenhouse "Uralochka" has a lot of useful qualities, among which one can single out the simplicity of installation and dismantling, reliability, sufficient durability with appropriate operation. Importantly, this design is offered in a wide range of sizes and areas, and can satisfy both beginner gardeners and experienced farmers using greenhouses for commercial needs.


